5 Leica M11 Snaps

Leica

Hey everyone!

It’s almost Christmas and 2023 is just around the corner. It feels like 2019 was just yesterday…what a crazy ride that was. Since covid I haven’t been photographing much as I’ve been busy with other things. Even when I was away on vacation I wanted to take it in and not press the resume button on photography. Well I’ll save this conversation for another time. This year I purchased the Leica M11 and I honestly couldn’t be happier. All the upgrades have been for the better and it’s everything I could ask for in a camera. I’ve photographed in the snow without any issues as well. Hopefully 2023 has more photography opportunities and I can continue to add to my portfolio.

I haven’t used the camera as much I wanted to but here are 5 images I’ve taken with this camera in the past month.

Tiede National Park – Tenerife Spain
Three birds on a beach – Tenerife Spain
Piccadilly Circus, London UK
Piccadilly Circus – London UK
Piccadilly Street – London UK

What’s In My Bag/Pocket? My EDC Camera: Ricoh GR Quick Review

Phototgraphy Tips

My Every Day Carry Camera: Ricoh GR 16.2MP

IMG_20190409_184843.jpg

As a photographer your favorite tool to capture life’s moments is your camera. But chances are you don’t want to lug around all your gear. Yes your camera phone is pretty good but it’s not the same as having a camera IMO. For people who have the same view  as myself usually purchase compact mirrorless cameras with interchangeable lenses. Now there is nothing wrong with that but having interchangeable lenses will give you G.A.S. (Gear Acquisition Syndrome) and you’ll want to carry another lens.

If I wanted to carry an interchangeable lens camera I’d just bring my Nikon with me but that’s not practical to have with me all the time nor can I fit that in my pocket. For me I’d rather bring a point and shoot camera that more portable like the Ricoh GR.

Here are some quick specs about the camera:


  • 16MP – APS-C CMOS Sensor
  • ISO 100 – 25600
  • 28 mm f2.80 Prime Lens
  • 3″ Fixed Type Screen
  • 4 fps continuous shooting
  • 1920 x 1080 video resolution
  • 245g. 117 x 61 x 35 mm


Why I LOVE the Ricoh GR

R0040166

I’m going to save us both the time by not doing an in-depth review on this camera. There’s countless reviews almost everywhere on the Internet. Plus I only care about 3 things when it comes to a EDC camera.

1: Is it Portable?

The camera is small enough to fit in your back pocket unless you’ve got too much junk in the trunk. If that’s the case, then empty your back pockets and put your camera there instead. I usually carry it in my jacket pocket or have it on my wrist.

2: Is it Easy to Use?

It’s a real point and shoot so there’s not much to think about except for composition. I usually shoot it in auto because why make things more complicated? ‘Real photographers don’t shoot in auto’ Lol, I guess I’m a faux-tographer.

3: Does it Have Good IQ?

The out of camera images are amazing, you could shoot JPGs all day and you will be happy with your images. (I usually shoot JPG+RAW on my Ricoh GR)

Here are a few sample images.

R0040328R0040391R0040169R0040379R0040265

The Flaws


R0040176

Flaws, we all got them and cameras have them too no doubt. The biggest issue is that the camera is prone to dust on the sensor (not a deal breaker, if you have a good camera repair shop they can sort it out for you). Another caveat for some is it’s a fixed focal length of 28MM (full frame focal length equivalent). However I had the same issue but I learned to love it instantly. Chances are if you’ve taken photos with your phone it’s more than likely a wide focal length as well. How often do you zoom anyways? And when you do, how bad is the quality? With the Ricoh GR it has an APS-C sensor which is a lot bigger than your camera phone sensor. You could always crop your images if you need to ‘zoom’ in.

Conclusion

Honestly this is one of the most fun cameras I own. This camera took me by surprise because I was honestly expecting a hyped up camera (which it’s not). Don’t take my word for it, get one and test it out yourself. If you’re not pleased with it, then…sell it to me =) What’s your one camera you always bring with you? Don’t forget to check out my other post and follow me on Instagram @supermoul

Photography Myths: How Bad Are ‘Cheap’ 10 Stop ND Filters?

Phototgraphy Tips, Uncategorized

IMG_4943

45 Second Exposure, Malta

*ALL my photos shown here are used with a cheap $15 USD ND Filter

To create images like the one above you will need a camera (with manual settings and bulb mode), any lens, tripod, shutter release cable/remote and of course the 10 Stop ND Filter.

The 10 Stop ND Filter

In this blog post we will be specifically talking about the 10 Stop ND filter. It’s basically what you think it is, it blocks light by 10 stops on your camera. Wait… What??? In a nut shell it will allow you to have longer exposures even in the bright sunlight. Let me explain it a little better…

Let’s say you want to photograph a waterfall but it’s 12:00 pm and very bright out. Your camera meter will tell you that you need a fast shutter speed because if you have a slower one it will be overexposed. To fix this issue you will need to use a neutral density filter. It will trick your camera to thinking it’s darker but in actuality it’s bright out. Since you have the ND filter on you are able to shoot at a slower shutter speed without having your images overexposed.

*Another great time to use it would be during sunset where you want to capture the light and movement of the clouds.

Is Cheap That Bad?

What’s the one thing people say when you buy something cheap and it breaks? ‘You get what you paid for’ Most of the time that’s very accurate but I’ve seen expensive things break faster than ‘cheap’ items all the time. If it’s cheap and it breaks people love to use that line, but if it’s cheap and has no issues you’re just lucky right? Kevin Hart said it the best, ‘Stay in your lane people.’ You don’t have to break the bank if you don’t need to.

With camera gear it’s always about ‘What’s the best…’ people are too fixated on what’s the best gear to photograph this or that. And what’s usually associated with the best? Price. To have better gear means spending more money right? Not true. I’ve used a cheap $25 tripod for the longest time and it’s as sturdy or more sturdy than my more expensive Manfrotto tripod now.

Sample Images

DSC_4966

90 Second exposure – Maderia, Portugal

IMG_4930

30 Second Exposure – Malta


DSC_4464

20 second exposure – Maderia, Portugal

IMG_6712

30 Second Exposure, Toulouse, France


Final Thoughts

I do notice some image degradation but for what you paid its more than worth it’s weight in gold. I’ve never tried the more expensive ones but if any companies would like to sponsor me I wouldn’t say no =)

Ultimately you could spend a fortune on photography gear because there’s always accessories or things you think you need to improve your photography but here’s a little secret…Practicing your photography will improve it more than any accessory can. In photography you will always get better and learn something new every time.

If you want to see more please follow me @supermoul on instagram. I will start to sell prints in the upcoming months. Stay tuned!!!


How to KISS with Photography

Phototgraphy Tips

How to KISS with Photography

IMG_0015

How to KISS with photography, oh yeah… dim your lights, put on some music and light some candles it about to get … No it’s not what you think turn your lights back on and blow out that candle.

If you haven’t heard of the KISS rule here’s what it stands for, ‘Keep It Simple Stupid’. And I don’t meant to offend anyone by using this rule, if it helps I use this rule as well so we can all be stupid smart together.

Anyways! When it comes to photography you may want to try to do something crazy, edgy, groundbreaking, some inception sh!+ , etc. But I’m here to tell you that you don’t need to, you can just keep it simple! Here are a few tips to help you out.

The Rule of Thirds

Screen Shot 2018-01-26 at 17.17.50

In the photo above you can see my subjects take up roughly 1/3 of the frame and the two point of interest are used on both of them.

The Rule of Thirds in a nutshell:

  • Use your subject to fill 1/3 or 2/3 of the frame
  • Put your subjects within the points of interest
  • Helps with composition

Use this as a rough guide to help improving composition

Screen Shot 2018-01-26 at 16.59.26

You could also crop your original image as well.

Make Your Subject Clear

IMG_1593

Having too many main subjects can be confusing at times because it’s better to have one main subject than to have 5 or more. You could also have supporting subjects to give more information to your audience. You just have to make it clear that there is one main subject and not 10. However there are times when there may be a lot happening (photographing war, protests, riots, etc.) and you have no option but to show everything.

Have FUN!

Screen Shot 2018-01-26 at 17.55.01

At the end of the day these are just suggestions, you can keep it simple or keep doing what you’ve been doing. Photography is all about making a photograph and not taking one. So get out there and make some more photos because you can only get better right? You are the artist and you don’t have to conform to anything. Like Dr Suess said, “Today you are you, that is truer than true. There is no one alive who is youer than you.”

***Remember, rules are meant to be broken so have at it! If you liked this post make sure to like, comment, follow and check out my Instagram page @supermoul

@

How To Fix Underexposed Photos On Your Phone

Phototgraphy Tips, Uncategorized

For this example we will be editing in Snapseed. (Download in your app store it’s FREE!)

The Photo

We will be working with this photo. You will notice that it is underexposed and you can’t see the foreground detail very well.

Screen Shot 2017-09-28 at 17.05.45

Step One

To get started open up your photo in Snapseed. Then click on the pencil/pen icon .

Screenshot_20170927-203203

This will lead you to the next screen. Now click on Tune image.

(To edit you hold your finger down on the screen and move it up or down to switch between tools. To adjust the image you just slide your finger left or right.)

Screenshot_20170927-203214


Step Two

The first thing I should do to brighten up this image is to just increase the brightness/exposure right? Well I could do that but what I want you guys to start practicing is to increase the shadows first. Look what happens after I increase the Shadows. (You can increase it more or less if you want.)

Screenshot_20170927-203247


Step Three

Now we want to adjust the highlights, for this photo it was indoors so there wasn’t too much to adjust but I like to lower the highlights so you can see more detail. (You can increase it instead of decreasing it if you’d like too if that’s what you like.)


Screenshot_20170927-203312


Step Four

Now we adjust the brightness/exposure. I adjusted it to how I like it. You may like your photo more or less brighter than mine, that’s fine. Here you can see after raising the brightness the image is now a well exposed photo without losing too much detail.

Screenshot_20170927-203338


Final Image


From here you can adjust everything else the way you like it. This is my final edit of it. I decided to go with B&W because that’s just me. The only thing I did different since increasing the brightness was just putting the saturation to -100.

IMG_1693-03

Final Thoughts

I could have edited this more if I wanted to but this was a quick 2 minute edit just to give you guys a rough guide.

I hope you liked this tip, if this helped you in any way please comment here or on my Instagram @supermoul. Follow me, like and comment if you found this informative. If there’s something else you want me to explain please let me know. Thanks everyone!

I will start a photography related YouTube channel soon!

I am not sponsored or paid to advertise this app. I use this personally when I’m on the go.


Photography – How To Stay Inspried

Phototgraphy Tips

Try Shooting Something Different!

IMG_1593

Are you out there taking photos of pets , food, buildings, or people all the time? Try switching it up for a bit. For example, if you only do landscapes, try food. You might be great at landscape photography, but what if you find you’re an amazing food photographer? You can actually eat your subjects…unlike landscape where there’s mostly dirt and I’m sure it’s not as delicious.


Go Shoot More

Screen Shot 2017-09-13 at 15.01.49

You will lose inspiration if you stop completely. I’ve seen a lot of people buying very expensive camera gear because they want to take great photos and end up selling it because they’ve only used it for two days. I’m not saying go out and take a photo every 5 minutes but try to go out and shoot a few times a week.

Meet Other Photographers

IMG_1014-2

This is one of my favourite quotes, “If you want to go fast go alone. If you want to go far go together.” – African Proverb

There are definitely more pros than cons with this one. You could meet people who can inspire you, teach you something new, and networking which can open doors to opportunities.

This is something I’m working on myself so if you’re in the London area message me on Instagram @supermoul 🙂

Take a Break!

DCIM100GOPROGOPR0021.JPG

Yes it’s okay to enjoy yourself! Grab a coffee, tea, snack or lounge around somewhere it’s okay I promise. Sometimes you just need a break from photography. If you’re on vacation  have fun with your friends. Don’t worry about getting every shot or taking 100 selfies per hour.

You might find it impossible not take out your phone and snap a photo of every dish on the table but sometimes it’s best to keep it in your trousers (your phone you pervs).

Closing

At the end of the day, shoot what makes you happy. If you don’t get uninspired then that’s amazing! You found your niche. For people like me I’m still trying to find myself as a photographer. Happy shooting and don’t forget to follow me on Instagram!


Why You Shouldn’t Delete Any Photos On Your Camera

Phototgraphy Tips

DSC_0271

Well that photo looks like garbage, you should probably delete it. I’m only kidding, don’t. Now I have had my fair share of crappy photos and I’m sure you have too but what do we do when we don’t like a photo? Simple, delete it right? Wrong. You should never delete a photo until you 100% sure the photo is not salvageable.

“But  it’s underexposed”. You can fix that.

“It’s overexposed” You can fix that.

“There’s something ruining the shot” Try to remove it.

“I don’t like the composition.” Try to crop it.

I’m giving you advice I wish someone had told me when I started photography. I’m sure I’ve lost plenty of good photos that I thought were bad. Or maybe they were all bad who knows. It’s always better to learn from other people’s mistakes right? Take it from me, you’ll thank yourself later.

It’s Underexposed

Screen Shot 2017-05-26 at 11.54.09

If this was me a few years ago I wouldn’t think twice and delete this photo. If I didn’t get it right in camera, then it wasn’t worth keeping. The truth is, you can fix your mistakes in post processing. Try to bring up the shadows and you’ll be surprised.


It’s Overexposed

Screen Shot 2017-05-26 at 12.00.49

Again the old me would have deleted this in a heart beat. Would you delete this photo? Did you think it was worth keeping? To be honest when I seen this photo I was upset initially, but I used some of my magic to make this a keeper. Try bringing down the highlights or exposure.

Extra Tip: If the colours are too dull and look unnatural when you add saturation, you should try it in B&W.


There’s Something In My Shot

Screen Shot 2017-05-26 at 12.19.08

Don’t fret my beautiful people, with the power of magic you too can remove objects out of your photos. Some may be trickier than others but in this case it worked well. Use the clone tool to remove unwanted objects. It’s like it was never there.

Composition Sucks

Screen Shot 2017-05-26 at 12.31.58

The Crop tool is an amazing tool to fix this. When cropping your photos make sure you get your main subject and remove the distractions. I could have left those rocks in the photo but what does it really add?

Screen Shot 2017-05-26 at 12.32.15


Conclusion

You probably have great photos you never knew you even had and you probably deleted a few too. Sometimes we make mistakes with in camera settings and it may lead to ‘bad’ photos but try your luck because you never know!

Don’t forget to share or follow me on Instagram @supermoul


-Vicheth


Improve Your Photography With Clouds

Phototgraphy Tips

IMG_0770-2

Picture this, you’ve booked a vacation and the weekly forecast predicts sunny with clear skies. Perfect! You packed your shorts, short sleeve shirt or that summer dress you’ve had sitting in your closet. You get there only to find out the weather has drastically changed. It’s raining and there’s no sun, are you still in the mood to take photographs? More importantly, who’s hiring these weather people? You shouldn’t let bad weather ruin your vacation or prevent you from going outside to take photos.

Clouds are your best friends when it comes to photography. It won’t be able to talk back to you, buy you a drink, or tell you “yes those jeans do make you look fat” but, it will help you with photography. Having clouds can add drama or mystery to your photo. You just have to turn a negative into a positive.


Look Up

DSC_3936-2


Now if that was clear sky, I don’t think I could create the same mood. I originally made this black and white but decided to add a touch of colour to it. When you’re in the post processing phase you have to make these photos yours. How you choose to compose and edit your photos will set you apart from everyone else. Find your style, and if you don’t have one just experiment until you do.


Get Out There

DCIM100GOPROGOPR0074.JPG

Shot on a GoPro

The northern part of Tenerife, Spain is known for its sporadic weather. Instead of getting our tan on, we grabbed our sweaters and took a chance. It did rain on our way in and yes it was very cloudy but I would have not taken this photo if we decided not to go. With photography you have to take your chances and make the best out of it.


Things To Remember

IMG_4880

Don’t forget to use that imagination you had as a child. Don’t ever let that slip away because you will need it in photography. When you look at this photo, what do you see? Just clouds? Or can your imagination create something out of it? I see an angry gopher fighting a two-headed snake but that’s just me. The next time you see clouds in the sky, don’t avoid them. Look up because not too many people do.

Make sure to follow me on Instagram @supermoul

-Vicheth

How To Improve Your Instagram Photos For Beginners: 5 Simple Mistakes You Can Fix Right Now

Phototgraphy Tips

Instagram has been my main outlet when it comes to photography. If it wasn’t for Instagram I wouldn’t be here writing to you. It has created this love for photography I never knew that was there. But just like everyone else, I started somewhere. I wasn’t always good at taking photos believe me, check my Instagram @supermoul you’ll see. I’ve kept all of my old photos to show my progression as a photographer. There are a lot of simple mistakes I’ve made along the way and I’d like to share them with you. Here are 5 steps to taking better photos.

Straighten Your Photos

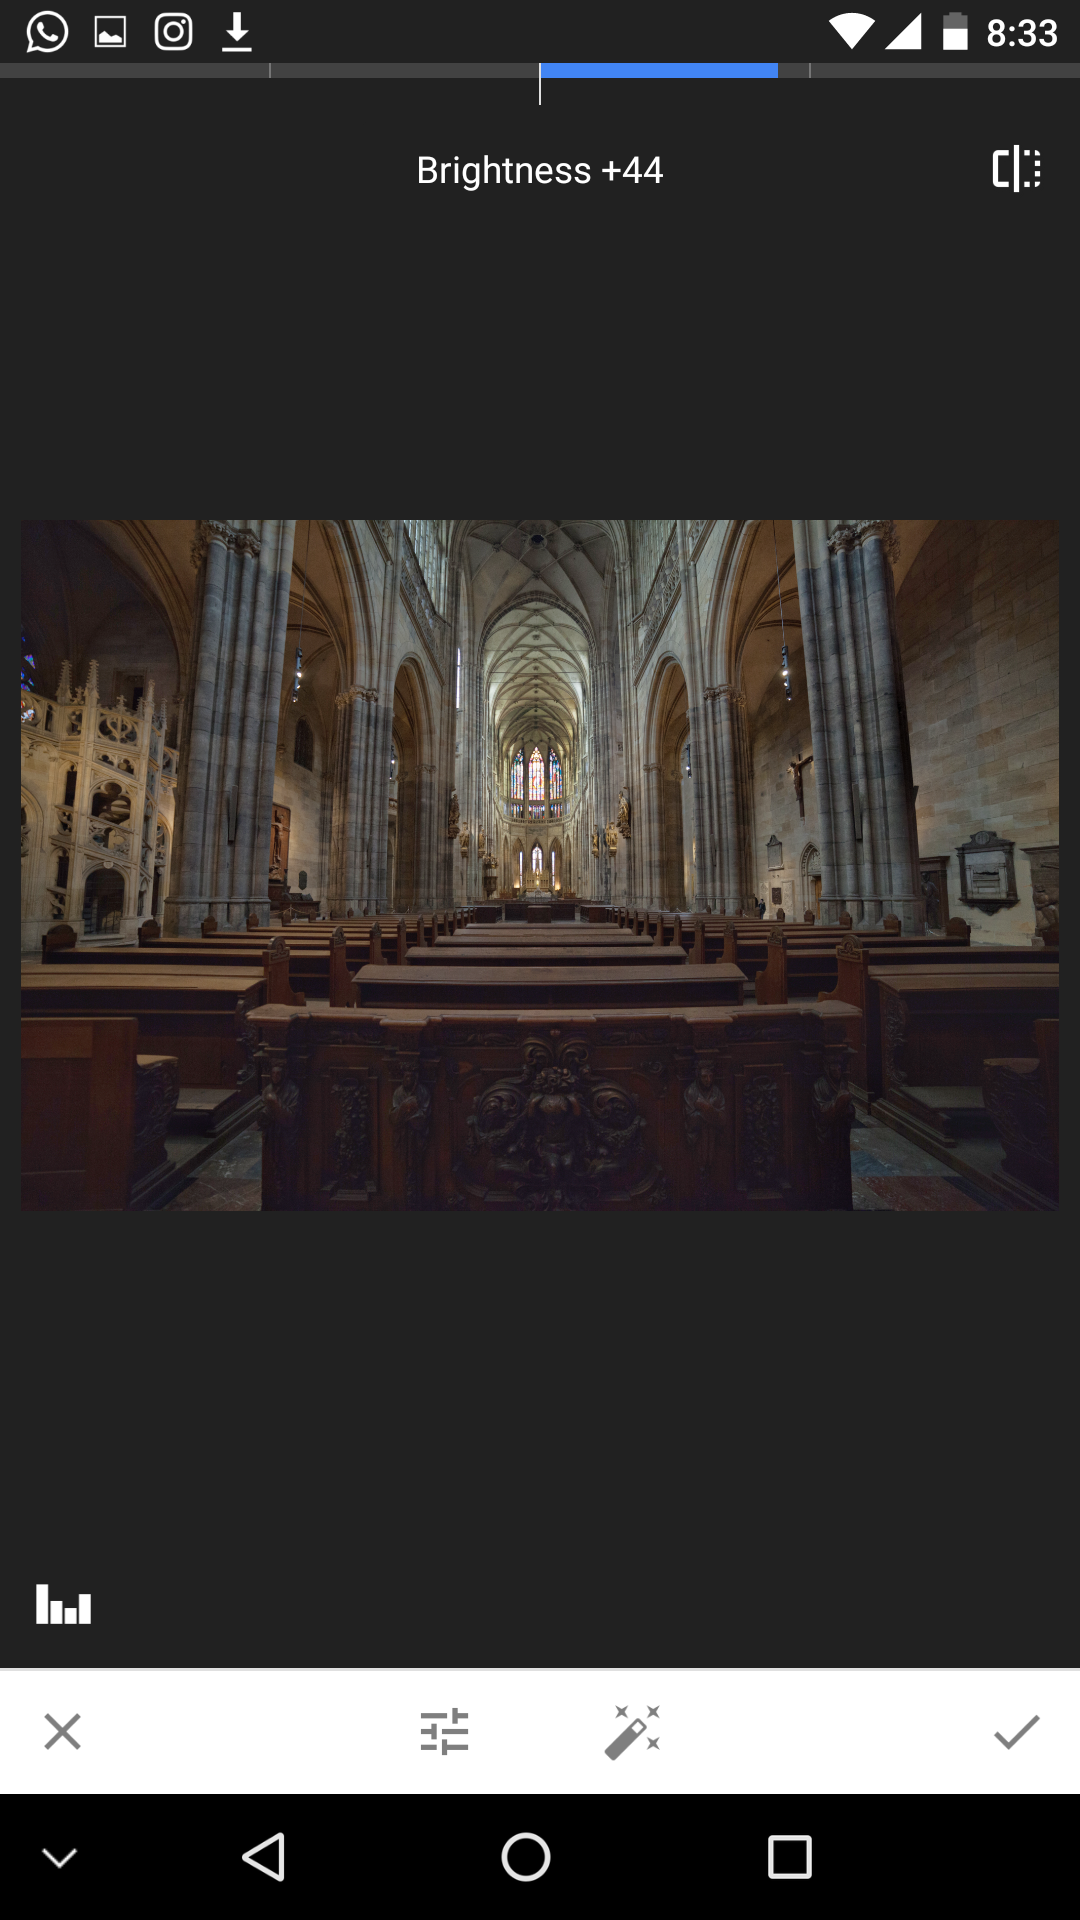
When taking photos you don’t want any distractions that could take away from your image. A common mistake I see a lot of people do including myself when starting out in photography is having a slanted horizon. You may forget or maybe you don’t notice it. You don’t need Photoshop or Lightroom to fix this. You can do it straight on your phone or Instagram. One of my favourite apps I use if I edit on my phone is Snapseed. You can also do this in Instagram going into the Edit tab and using the Adjust tool.

Now what looks better? This

Screen Shot 2017-05-23 at 01.57.52

or this?

Screen Shot 2017-05-23 at 01.59.14

Less Saturation Goes A Long Way

We’ve all done it. I’m guilty of committing this offense. When I first started taking photos I would give my photos unrealistic colours. To me I thought it was amazing because the colours looked incredible…or so I thought.  It’s okay to saturate your images but don’t overdo it.

Here’s what too much saturation looks like.

Screen Shot 2017-05-23 at 02.06.53

Here’s my actual photo.

Screen Shot 2017-05-23 at 02.06.39


A Bad Photo Is Still A Bad Photo (Even In Black And White)

The colours may be a little off or our subject isn’t interesting enough. I know, let’s make it black and white! That should fix everything…well not really. Sometimes you get those photos where you just don’t like the look of it, or the colours just don’t add anything to it. You have two options here; get rid of it, or see if it’s salvageable in black and white. Sometimes it works and sometimes it won’t. Simply converting your photos doesn’t make them more artsy or appealing.

Here’s an example of a bad photo I took. I was trying to find an interesting composition, but it was a bust. If it’s a bad photo, just move on and on to the next. Sometimes you have to take 20, 50, or 100+ photos before you get one good photo.
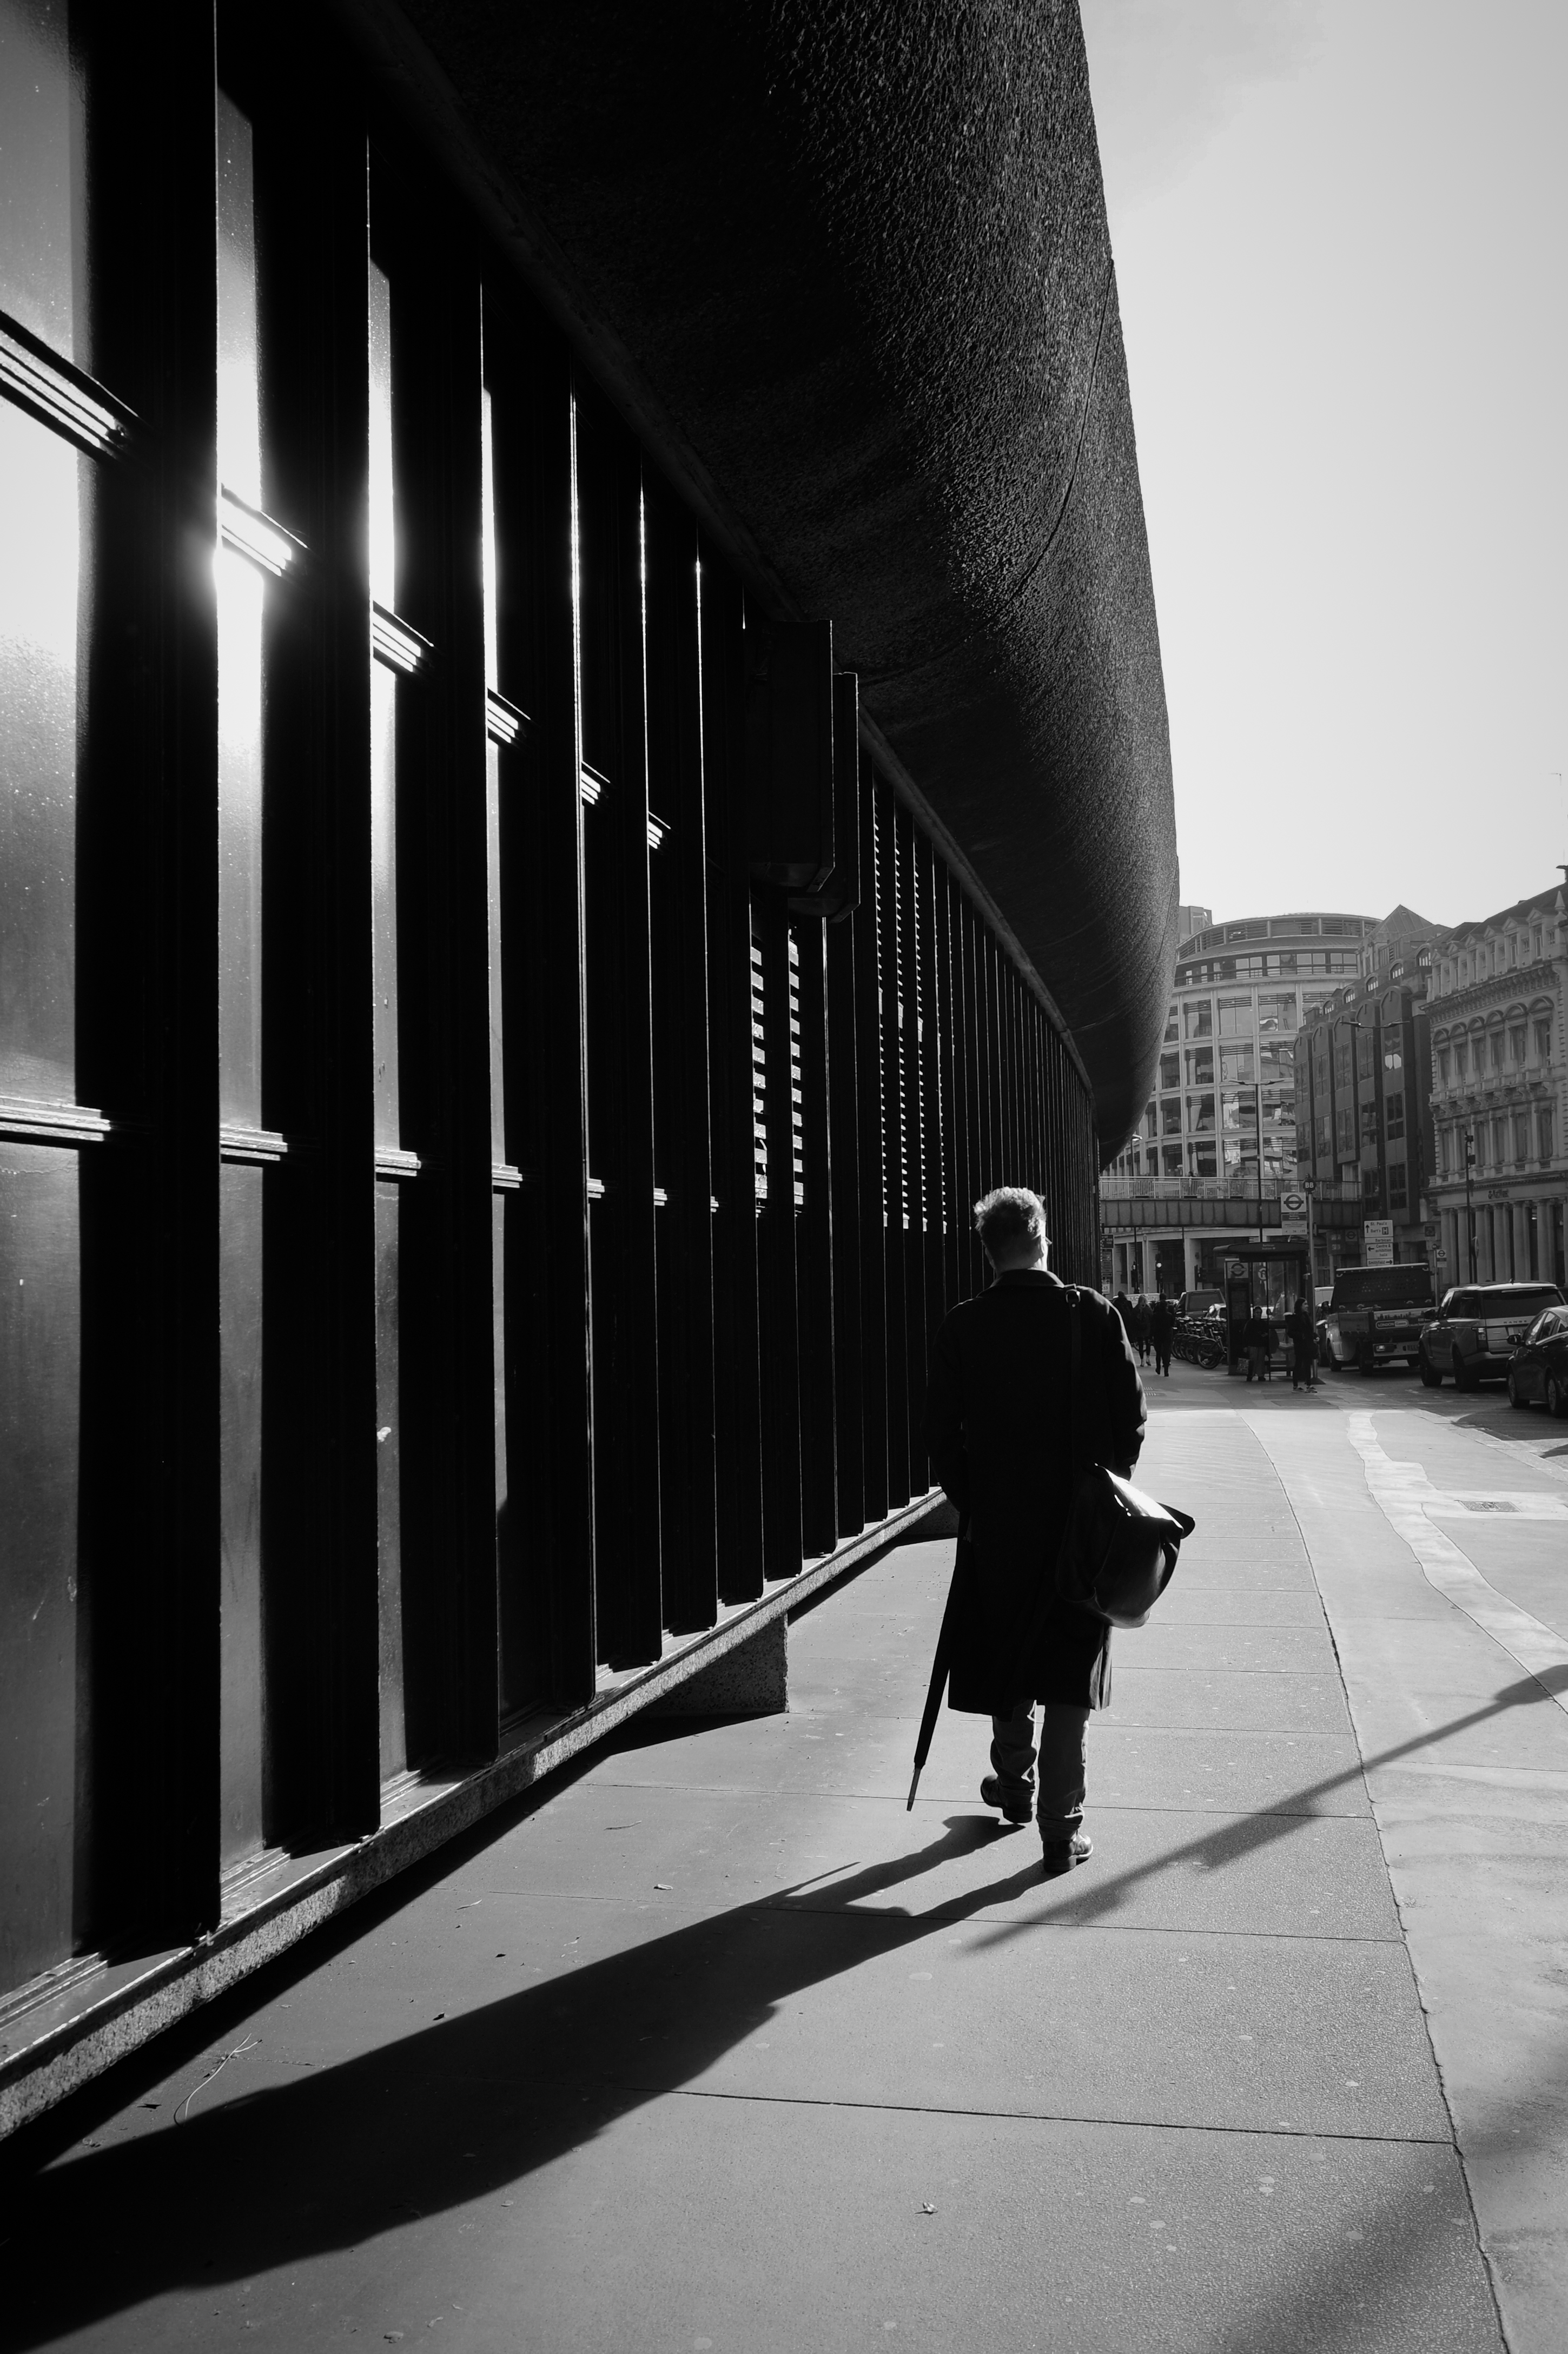
Screen Shot 2017-05-23 at 12.37.35

Use Symmetry

People love symmetry. Would you buy an orange if it wasn’t perfectly round? Probably not, and there’s a reason why we don’t see them for sale. Symmetry is pleasing to us, even in finding partners we desire people who are more symmetrical. Would you rather date Quasimodo or Gaston? If you’re shallow like most of us, you’d probably choose the douchebag Gaston.

Before digital came around everyone used film. Everyone was cautious of what they took photos of because you had to pay to buy rolls of film and get them developed. In the digital age you just point and shoot without thinking about it. The one thing that helped me improved my photography was taking time to get the right shot. Limiting your mistakes before post processing saves a lot of time and hard drive space.


Your photos dont’ have to be 100% symmetrical, but use it as a guideline.

Screen Shot 2017-05-23 at 12.58.57

Have Fun

Don’t take photos for the likes, comments or followers. Do it for yourself. I used to care about how many likes my photos got, but now a days it doesn’t bother me. Some photos get more love than others, it’s just how it is. You aren’t always going to be taking amazing photos all the time, but try your best.

You are your biggest fan, and your biggest critic. Don’t be discouraged if you have days where you get no good photos at all, it happens. There are numerous occasions where I come back with one or two usable photos. Don’t stress yourself out. There are things that’s beyond our control, make the best out of every situation. So what are you waiting for?


-Vicheth